Software Features
There are various pieces of software running on a TAC that you are likely to interact with. This page gives you an overview of some of this software and how it is used.
System Daemon: tacd
The LXA TAC system daemon tacd provides three ways to interact with the
device:
The LCD screen on the device
The interactive web interface
An API accessible via HTTP
LCD
The TAC provides an interface to perform some tasks directly on the device, this allows you to e.g. wire up a a DUT in a rack and check basic operation without requiring a computer at hand.
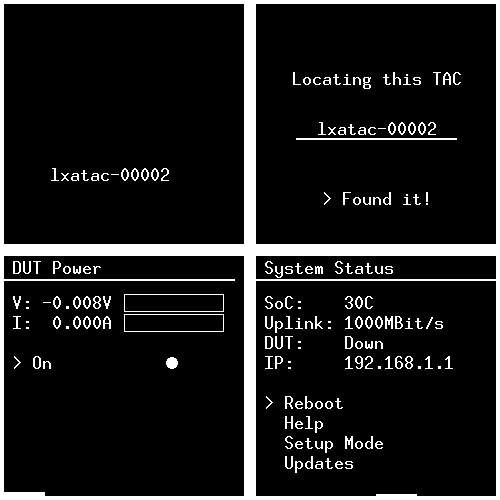
Screensaver, locator screen, DUT power control, LXA TAC system status.
The different screens can be navigated via the two buttons on the front of the device. Short button presses toggle through screens or options, long button presses perform actions.
Web Interface
The web interface gives access to even more features of the TAC than the LCD. You can use it to get an overview of how your DUT is doing and control it interactively.
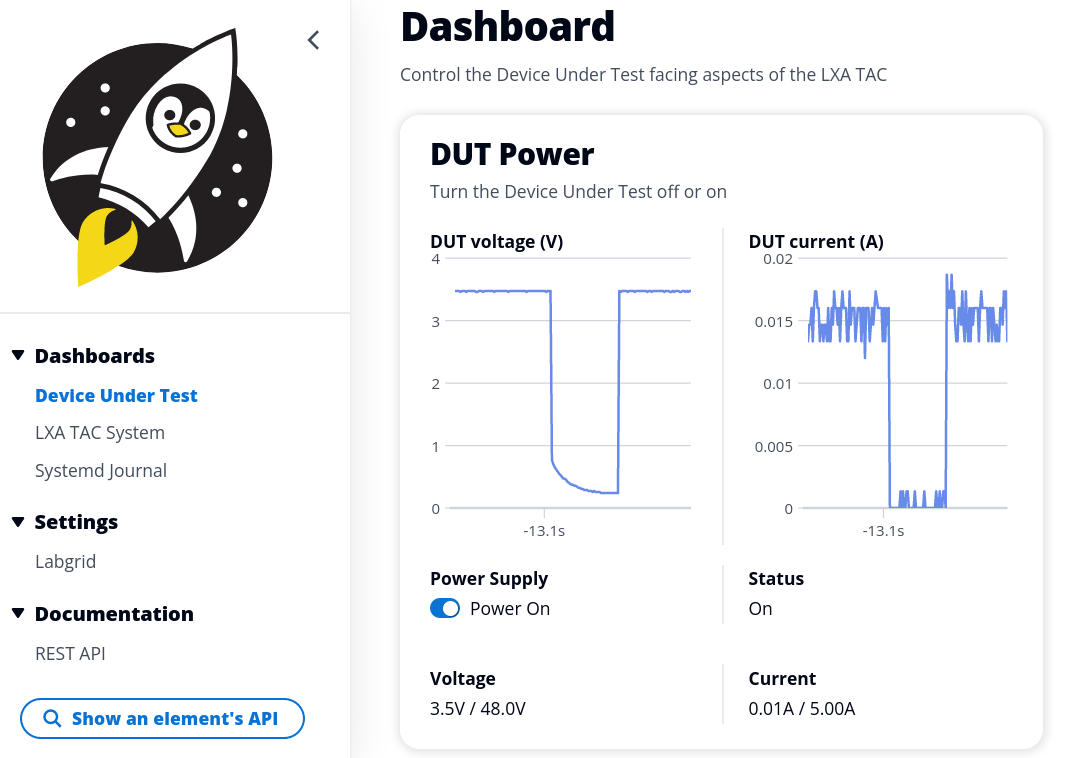
The device under test dashboard - power cycling a microcontroller board
The web interface provides you with a lot of graphs and measurements, which can come in handy. Please use these measurements like you would use a kitchen scale - you can trust them when making measurements to bake a delicious cake, not to mix up potentially dangerous medicine. Use a professional volt- and ammeter when you need it.
HTTP API
The controls and measurements available via the web interface are also available via an HTTP API. You can get documentation for the available endpoints via the Documentation > REST API menu entry in the web interface or by first clicking the Show an element’s API button followed by the element you want to see the endpoint for.
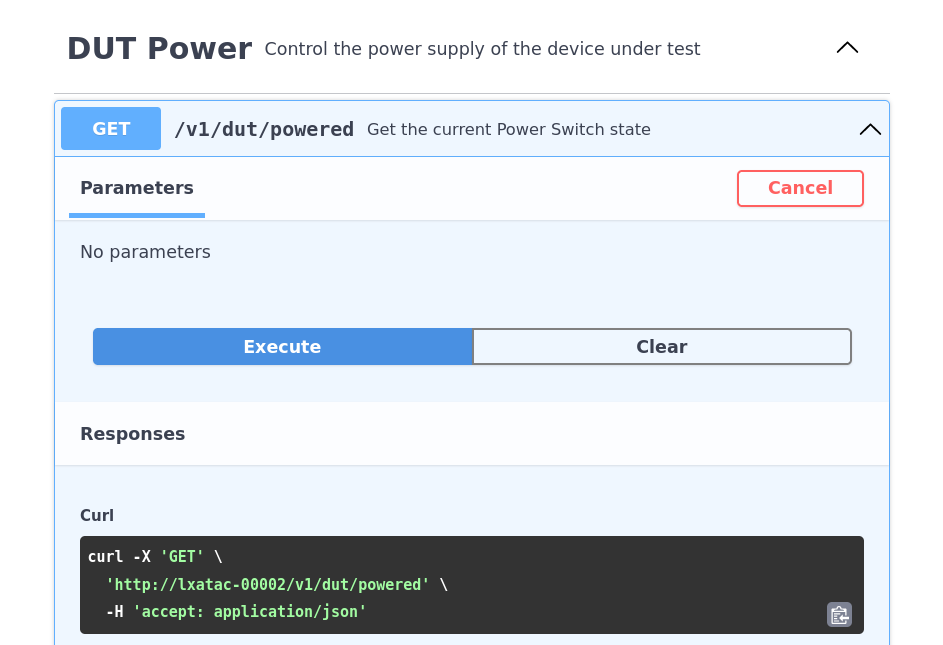
The device under test dashboard - power cycling a microcontroller board
This gives you the endpoint documentation and a way to try it out right in the browser.
Generic Webserver
The generic webserver can be used to serve arbitrary files on the network.
Any files or directories placed in /srv/www/ will be accessible at
http://{lxatac hostname}/srv/.
The webserver can be used as a Labgrid RemoteHttpProvider using the following Labgrid environment configuration:
RemoteHTTPProvider:
  host: '{lxatac hostname}'
  internal: '/srv/www/'
  external: 'http://{lxatac hostname}/srv/'
Lab Automation: labgrid exporter
The labgrid-exporter connects to a labgrid-coordinator somewhere in
your infrastructure and exports the resources of your TAC to it.
If your labgrid coordinator is is accessible via the labgrid hostname and
listening on the default port number 20408 this should just work out of the
box and you should already see the TAC’s resources on the coordinator.
If your coordinator is available via another hostname you will have to edit the
labgrid environment via the web interface or the /etc/labgrid/environment
file on the TAC and restart the exporter (via the web interface or
systemctl restart labgrid-exporter).
You can get an overview of the exporter status via the log output in the
web interface or on the command line via journalctl -fu labgrid-exporter
and systemctl status labgrid-exporter.
If everything is set up correctly you should see the exported resources in
labgrid-client on your PC:
$ labgrid-client resources | grep lxatac
lxatac-00005/dut_power/NetworkPowerPort
lxatac-00005/serial/NetworkSerialPort
Note
Labgrid relies on hostname resolution working correctly in your network. If you’ve previously used an IP address to access the TAC via the network instead of a hostname, because name resolution did not succeed, you will quickly notice that many labgrid operations will not work.
Automation Devices: lxa-iobus
The LXA IOBus server on the TAC is enabled by default and can be reached by
either clicking through the tacd web interface via
Dashboards > Device under Test > LXA IOBus > Web Interface or by typing
http://{LXA TAC hostname or IP address}:8080/ into your browsers address
bar.
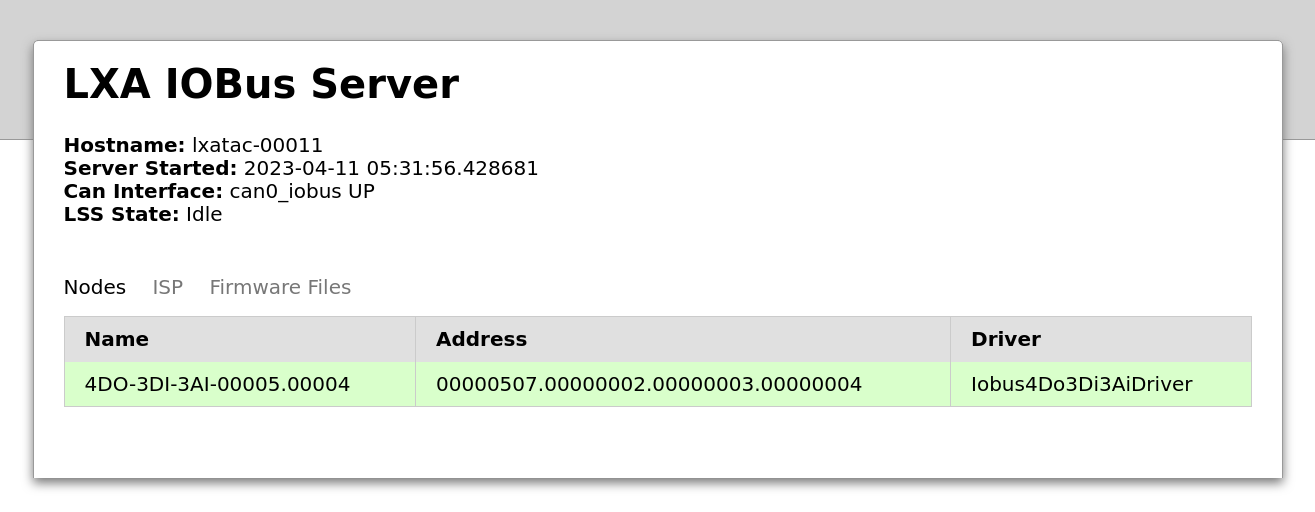
IOBus server web interface with no IOBus nodes attached
Attaching a single node is as easy as taking a D-Sub 9 cable and connecting the node to the TAC, to attach multiple nodes you can either use a custom-made wiring harness or a LXA IOBus 1BI-3BO bus multiplexer.
Switchable 12V voltage injection and CAN bus termination are already handled inside the TAC. New nodes are automatically discovered by the IOBus server and made available in the web interface and the IOBus server HTTP API, making them available for use in your labgrid exporter config.
Network Config: NetworkManager
The TAC uses NetworkManager to configure its network interfaces. The TAC has two external network interfaces, the Uplink port on the display side, which is used to connect to your infrastructure and the DUT port which is used to connect to a device under test.
Under the hood these two ports are implemented using a three port ethernet switch. Two of the switch ports are connected to the external ports mentioned above, while the third port is connected to the SoC of the TAC.
Using the Linux DSA (distributed switch architecture) framework it is possible to treat the external ports as two independent interfaces in Linux, even though they are physically located behind a switch.
By default the two external ports are bridged together, meaning the TAC behaves just like a simple transparent ethernet switch, connecting you DUT to the same network you TAC is connected to.
This information should help us make sense of the ip link output below:
root@lxatac-00002:~ ip link | grep -B 1 ether
4: switch: <BROADCAST,MULTICAST,UP,LOWER_UP> mtu 1501 qdisc …
    link/ether 18:74:e2:a0:00:10 brd ff:ff:ff:ff:ff:ff
5: dut@switch: <NO-CARRIER,BROADCAST,MULTICAST,UP> mtu 1500 qdisc …
    link/ether 18:74:e2:a0:00:11 brd ff:ff:ff:ff:ff:ff
6: uplink@switch: <BROADCAST,MULTICAST,UP,LOWER_UP> mtu 1500 qdisc …
    link/ether 18:74:e2:a0:00:12 brd ff:ff:ff:ff:ff:ff
7: tac-bridge: <BROADCAST,MULTICAST,UP,LOWER_UP> mtu 1500 qdisc …
    link/ether 18:74:e2:a0:00:13 brd ff:ff:ff:ff:ff:ff
switchThe physical interface going from the TAC’s SoC to the on-board switch.
dutThe external DUT port. Data on this port actually flows through
switchand is guided out of the correct port using tags added by the DSA framework.uplinkThe same as the
dutinterface but for the Uplink port.tac-bridgeA bridge over the
dutanduplinkinterfaces that ties them back into the same layer 2 network. The DSA framework is smart enough so that the data between Uplink and DUT does not actually flow through the SoC but is instead handled at line speed inside the switch IC.
The IP address of your TAC is configured on the tac-bridge interface and
you should most likely keep it that way.
If you want to isolate the DUT port of a TAC from the Uplink port you can
do so by removing the dut interface from the tac-bridge using e.g.
nmtui:
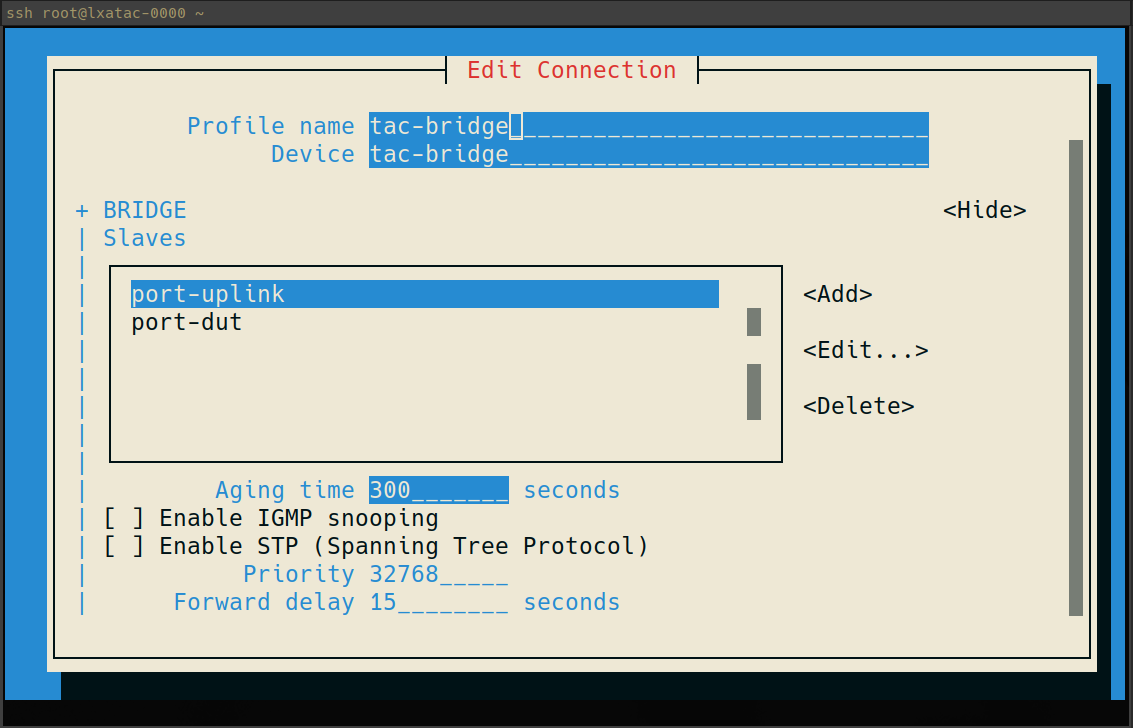
nmtui in action - configuring the tac-bridge interface
USB Gadget: tac-gadget-*
A set of helper scripts is deployed on the TAC that demonstrates how to use the USB gadget port:
tac-gadget-audio
Sets up the LXA TAC as an USB sound card. A new audio device with one output and one input will appear on both the TAC…
root@lxatac-00002:~ tac-gadget-audio
root@lxatac-00002:~ alsactl info
- card: 0
  id: UAC2Gadget
  …
  pcm:
    - stream: PLAYBACK
      …
    - stream: CAPTURE
      …
… as well as the device the USB cable is connected to (e.g. the DUT):
root@dut $ alsactl info 2
- card: 2
  id: LXATAC
  name: LXATAC
  longname: Linux Automation GmbH LXATAC at usb-0000:00:14.0-3, high speed
  driver_name: USB-Audio
  …
  pcm:
    - stream: PLAYBACK
      …
    - stream: CAPTURE
      …
The PLAYBACK and CAPTURE streams are each connected to the
corresponding other stream on the other side.
This allows you to stream digital audio out of and into a DUT.
tac-gadget-ethernet
Sets up the LXA TAC as an USB network card. The connection will show up as network device on the TAC:
root@lxatac-00002:~ tac-gadget-ethernet
root@lxatac-00002:~ ip link show usb0
8: usb0: <BROADCAST,MULTICAST> mtu 1500 qdisc noop state DOWN mode DEFAULT …
    link/ether 18:74:e2:a0:00:14 brd ff:ff:ff:ff:ff:ff
As well as on the device the USB cable is connected to (e.g. the DUT):
root@dut $ ip link show enp0s20u3
4: enp0s20u3: <BROADCAST,MULTICAST> mtu 1500 qdisc noop state DOWN mode DEFAULT …
    link/ether 18:74:e2:a0:00:15 brd ff:ff:ff:ff:ff:ff
And can for example be added to the tac-bridge to give network access to
a DUT without ethernet port.
tac-gadget-hid
Sets up the LXA TAC as an USB keyboard. We do however not have a good userspace tool to use this right now.
tac-gadget-serial
Sets up a serial port on the TAC and connected device. You could e.g. configure your DUT to start a getty on said serial port:
root@dut $ systemctl enable --now getty@ttyACM0.service
Or just open a terminal program on it to chat with the TAC:
root@dut $ microcom -p /dev/ttyACM0
Then you will be able to use the other side of the serial port from your TAC:
root@lxatac-00002:~ microcom -p /dev/ttyGS0
connected to /dev/ttyGS0
Escape character: Ctrl-\
Type the escape character to get to the prompt.

dut login:
tac-gadget-storage
Sets up the TAC as an USB storage device, so it acts like an USB stick. You can use it to boot a DUT from it or just to transfer files from one device to another:
root@lxatac-00002:~ mkdir to-dut
root@lxatac-00002:~ echo "Hey DUT!" > to-dut/greeting
root@lxatac-00002:~ mkfs.ext4 -d to-dut/ -L "To_DUT" usb.ext4 100M
root@lxatac-00002:~ tac-gadget-storage usb.ext4
root@dut $ mkdir mnt
root@dut $ mount /dev/disk/by-label/To_DUT mnt
root@dut $ cat mnt/greeting
Hey DUT!
root@dut $ echo "Hey TAC!" > mnt/greeting
root@dut $ umount mnt
root@lxatac-00002:~ mkdir mnt
root@lxatac-00002:~ mount -o loop usb.ext4 mnt
root@lxatac-00002:~ cat mnt/greeting
Hey TAC!
root@lxatac-00002:~ umount mnt
Note
Make sure not to mount the filesystem on both devices at the same time, as this can easily lead to an inconsistent state.
tac-gadget-remove
Stop the currently running USB Gadget. This is also implicitly called by all of the other scripts on start, as currently only one gadget at a time can be set up.
Containers
There may be situations where you want to try out or use a piece of software that is not yet part of the LXA TAC’s meta-lxatac OS images.
While that can certainly be changed (feel free to open an issue or pull
request! Or have a look at the
customization
section of the README), there is an easier way to quickly try out software
on the TAC: podman.
To make setting up an interactive Debian container a bit easier we provide LXA TAC specific
wrappers around the podman container runtime.
If you already have some container experience you can also use podman directly.
The container-start script sets up and starts a single Debian-based container on your device.
Use container-start to start a shell in a Debian container.
This container will behave like a local installation:
Changed made to the file system are persistent, e.g. installed application will be retained.
The
/srvdirectory is mounted.The container is privileged, so all connected devices are usable.
Note
On first start the container needs to be downloaded.
root@lxatac-00013:~# container-start
INFO: Starting Debian container using Podman.

root@lxatac-00013-debian:/# apt update
Hit:1 http://deb.debian.org/debian bookworm InRelease
(...)
14 packages can be upgraded. Run 'apt list --upgradable' to see them.

root@lxatac-00013-debian:/# apt install 2048
(...)
The following NEW packages will be installed:
  2048
(...)
Unpacking 2048 (0.20220905.1556-1) ...
Setting up 2048 (0.20220905.1556-1) ...

root@lxatac-00013-debian:/# /usr/games/2048
2048.c                 0 pts


   ·      2      ·      4


   ·      ·      ·      ·


   ·      ·      ·      ·


   ·      ·      ·      ·


         TERMINATED
root@lxatac-00013-debian:/#
exit
root@lxatac-00013:~#
Use container-update to update the base-image:
root@lxatac-00013:~# container-update
ATTENTION: Container update requires Internet access and correct system time!
wget: note: TLS certificate validation not implemented
INFO: Got connection with hub.docker.com
Trying to pull docker.io/library/debian:bullseye...
Getting image source signatures
Copying blob 6c8fc6a3ed50 done   |
Copying config bf99c88537 done   |
Writing manifest to image destination
bf99c88537836aaf739ebe7af883dcf5b11a1f12c82587f165ae34025ea466d3
Analysis: CAN
The can1 interface of the LXA TAC is available to the user of the TAC for
interaction with the DUT.
The interface supports CAN FD and can optionally terminate the bus with a
built-in 120Ω resistor.
Basic Usage
The parameters of the CAN bus can be configured using the ip link command:
# Disable the interface
root@lxatac-00002:~ ip link set dev can1 down

# Get a list of CAN-specific options
root@lxatac-00002:~ ip link set dev can1 type can help
Usage: ip link set DEVICE type can
…

# Set the interface up with a bitrate of 100k Baud
root@lxatac-00002:~ ip link set dev can1 up type can bitrate 100000

# Set the interface up in CAN FD mode
root@lxatac-00002:~ ip link set dev can1 up type can bitrate 625000 dbitrate 2500000 fd on

# Do not send acks or nacks
root@lxatac-00002:~ ip link set dev can1 type can listen-only on

# Enable 120Ω bus termination
root@lxatac-00002:~ ip link set dev can1 type can termination 120
The cansend and candump commands can be used to interact with devices
on the bus.
See the
LXA IOBus 4DO-3DI-3AI documentation
for an example on how to control an IOBus device using only cansend and
candump.
Capturing using Wireshark
For more in-depth analysis you can use the remote capturing feature in
Wireshark to capture CAN frames via SSH.
Use the TAC’s hostname, SSH port, username and CAN interface to configure
remote capturing in Wireshark.
Select the dumpcap remote capture command as shown below:
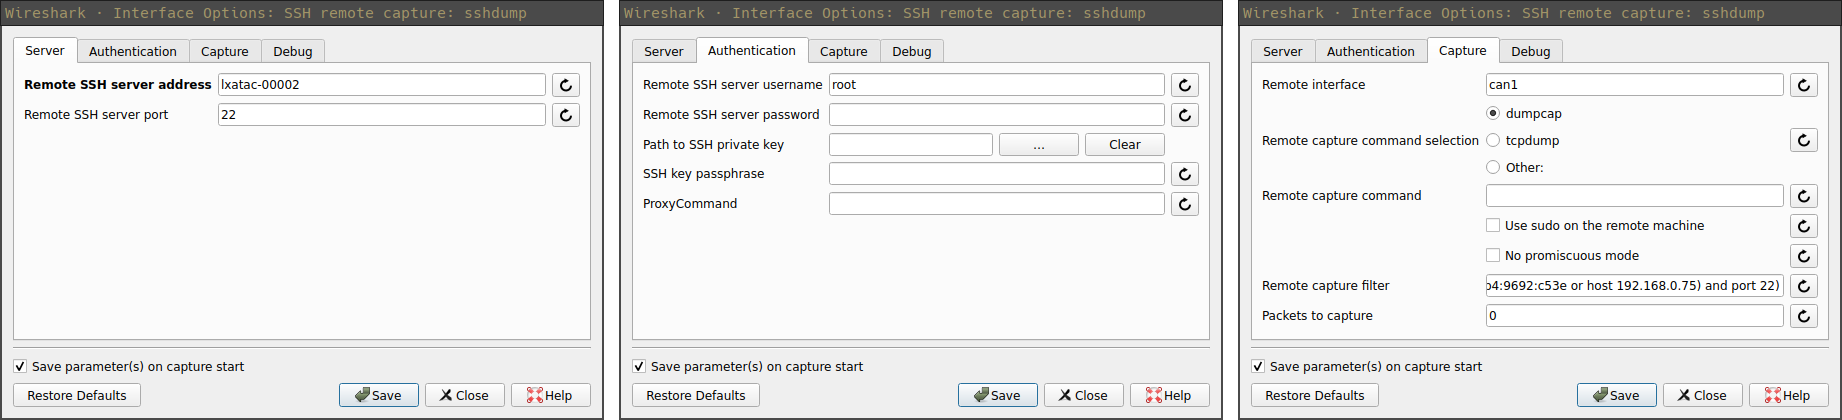
Configuration options to capture CAN Frames via SSH
Once the capture is set up you can use the various packet decoders and analysis features provided by Wireshark:
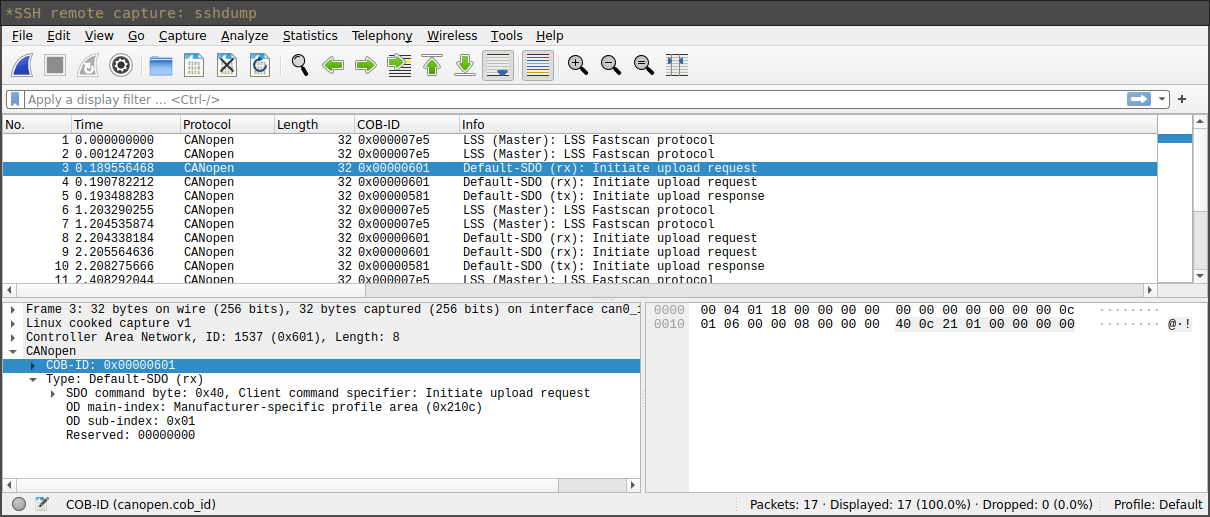
Wireshark showing a list of captured frames
Known Issue: Resetting the Error Counter
CAN is built around the idea that all nodes on a bus can share the same state.
To achieve this every frame on the bus gets acknowledged by all other nodes on the bus, if the frame was received
correctly.
In case of transmission errors an error frame is generated and the erroneous frame is discarded by all nodes on the
bus.
To make sure that a defective node does not permanently disable the bus, each node tracks how many transmit- and
receive-errors it has encountered.
These values are presented as the berr-counter:
# can1 had transmit errors and is now disconnected from the CAN-bus
root@lxatac-00034:~# ip -detail link show can1
3: can1: <NOARP,UP,LOWER_UP,ECHO> mtu 16 qdisc pfifo_fast state UP mode DEFAULT group default qlen 10
    link/can  promiscuity 0 allmulti 0 minmtu 16 maxmtu 16
    can state ERROR-PASSIVE (berr-counter tx 128 rx 0) restart-ms 0
A node where one of the counters reaches 128 will disconnect itself from the bus.
In general the berr-counter can be reset by setting the can-device down and up.
On the STM32MP1 SoC used in the LXA TAC however, there is a limitation that makes this process more complicated.
See this patch for more
technical details.
Note
On the SMT32MP1 SoC used in the LXA TAC, both CAN interfaces share the same (SoC-internal) reset signal
leading to a situation where the berr-counter can only be reset if both CAN-interfaces are down at the
same time.
Setting the can0_iobus down momentarily, to work around this issue and reset the can1 berr-counter,
usually does not affect the function of the IOBus.